Mamahood Styled


4/25/2018

// window treatments & selectblinds.com //

Guys! I'm so excited to tell you about our window treatments! Ideally, our new house has big windows in the main living areas and I knew I wanted ceiling to floor white flowy curtains on those. On all other windows, white shutters would have been ideal but not within our budget. So we knew we wanted white (faux) wood blinds instead. They are classic and versatile for the look of our home and curb appeal. We went to our local hardware stores to price them out and were so shocked to see how absolutely expensive they were and we would have to trim them ourselves, since they only trim specific brands. I started looking for alternatives and found SelectBlinds! I I had never heard of buying blinds online but the reviews sounded amazing and the price was incredible, especially compared to them being completely customized! We decided to install their Signature Faux Wood 2" blinds on 9 of our windows (including a huge window in the garage)! I was so impressed by the high quality and they look so sturdy and attractive in our new place!
custom cut blinds to fit our two different sized windows in our home office!

Dining Room 

View from the Living Room

Blinds in the Kitchen

They even custom cut matching blinds for this itty window in our half bath!


The great thing is they have so many different window treatments, all customizable to your needs and likes! I can't give enough kudos to their customer service, too! I had Mark answer all of my questions, and he even helped me figure out what treatments would go best with the aesthetics and needs of our home! You can order samples before you commit, too! I can't recommend selectblinds.com enough!

4/19/2018

// little spoon organic: baby blends delivery service //


I am so excited to share all about Little Spoon Organic!! They are a homemade baby food delivery service delivered to your doorstep. Every ingredient is organic, non-GMO, and specifically selected by a team of experts- this includes a pediatrician, dietitian, & nutrionist! They've tailored each meal to meet the needs of our individual baby's developmental needs. Each Babyblend comes with its own little spoon, and packed with the micro and macro nutrients our babies need at their specific age!

I'll be updating this post with more info and pictures as we go through our first delivery but I just had to share because I received sooo many messages inquiring about it since I posted. With Oliver, I made every single food he consumed, with Luna, second child syndrome hit me hard and I haven't carved out the time to consistently do it! We practiced a combination of baby led weaning and purees with both, so to be completely honest, this is a lifesaver! My biggest push towards this was that they point out the shelf life of store bought baby foods- yuck! Also, these blends sound so vibrant, delicious and adventurous for a baby's palette!

Here is a link: Little Spoon Organic that does give me credit if you purchase, so feel free to use it, and for a limited time get 15% off using code TRYBABYBLENDS15 !!!

xoxo


2/14/2018

Playing with Oliver & the Osmo Pizza Co. Game!


Last night, Oliver opened up his Valentine's Day Eve gift: the Osmo Pizza Co. Game! As soon as he saw the packaging he exclaimed "OSMO!!!!" I asked him how he knew what it was and he said because of the letters "O-S-M-O means Osmo! I've seen it before!" I'm not sure what ad he saw but he knew exactly what it was and was so excited to play with it!
The debate on whether technology is good for our littles, how much screen time to give them, and what they should learn from is a hot topic. For me, as a mother and educator, I take an all-in-moderation approach. Just like the foods that we consume, I want my child to be exposed to a little bit of everything in healthy doses. Technology is an integral part of our daily lives and quite honestly, it saves me from time to time as a busy mom who sometimes needs a time out or the entertainment to get things done! But I try to stay well aware of what my child is watching and continuously educate him on what is appropriate (so much so that he will come and tell me that he shouldn't be watching certain things because "they are not being kind" or "they used mean words." With that being said, I want my child to be a learner of the present and future (just like my students). I'm all for technology that allows my child to be creative, explore coding, learn, and think outside the box. 

If you haven't heard about Osmo, it is an educational system to use on your iPad or iPhone- it has different programs you can collect that help kids learn educational concepts like coding, math, reading, art, music, etc. The particular system Oliver has is the Pizza Co. Game which centralizes its educational approach on fostering kids' social-emotional learning, money, math and owning a business. I first let Oliver explore the game as is, and it quickly introduced the premise- he is left to run a pizza shop and has to make his customers happy by getting their orders correct and giving them the correct change. While, Oliver is really good at math already, he required assistance with it. You see, the characters don't speak, captions show up on the screen and you can decipher what they are saying by their gestures and the graphics on screen. I ended up changing it to Junior Mode to see if he could do it on his own!

It was so neat to see his face light up when he realized his actions could be seen. He was able to successfully fill his customers' orders by paying attention to the graphics and visual cues! I'm a total visual and kinesthetic learner, and I think my kid is, too- we learn by seeing and doing. He was able to manipulate the pieces and pay attention to the characters' cues and expressions; this non-verbal communication is so key to relationships- I'm so glad Osmo thought of that, too! Every year on Valentines, we make or order a heart-shaped pizza and I'm already thinking his new Osmo Pizza Co. game will make an appearance!  I'm excited to continue exploring this game and growing our Osmo collection! 


#OsmoPizzaLove

Image result for osmo pizza co

1/18/2018

// breastfeeding + pumping 101 //

I have been receiving a lot of messages lately inquiring about breastfeeding/pumping tips. I feel pretty well versed in this, as I struggled immensely with both babies but was able to maintain a positive breastfeeding journey with both! I ended up nursing Oliver until past a year and a half and my goal with Luna is to make it 1 year (we are at the 5 month mark now). Please keep in mind that these tips worked for me and each baby is different (case and point: my Oliver and my Luna are night and day with their nursing). Also, #fedisbest, so do you, boo!

Both Oliver and Luna were born with lip ties AND tongue ties which made is incredibly painful (I'm talking legit excruciating, toe-curling-razor blades every time they latched on- pain- and then it continued throughout gulp of milk attempt)! With Oliver, it took a bit for anyone to believe that his tongue/lip ties were issues (including his pediatrician at the time, the hospital ENT, and two nurses)- but eventually, I found a lactation consultant that I skyped with from New York, as well as my own LC, and we found a specialist in San Diego who solved it all for us! Because it had been a couple of months, we had to take Oliver to the chiropractor and massage therapist for sacral cranial therapy to help re-teach him to use his mouth properly! With Luna, I knew exactly what to look for and to advocate for us! The hospital pediatrician told me her tie was nothing but I was already in so much pain that I knew I needed it fixed. A second pediatrician came in and told me not to worry about it. But I knew this had a solution (and can totally see why many mamas are told not to worry about it and end up struggling so much)! At 5 days old, she had the procedure done and unfortunately, it didn't fix anything. I had to take her back 3 days later because her tongue tie was actually deeper but immediately after she latched on, I felt a difference! Yay to their amazing Pediatric Dentist who did it locally!

Tip #1: breastfeeding should NOT be excruciatingly painful! Look for lip and tongue ties and know that not all doctors will agree with you. 

With Oliver, I started pumping immediately (while at the hospital) because I was so nervous my milk wouldn't come in and I'd starve my baby. I ended up creating an oversupply and foremilk/hindmilk imbalance that I swear is worse than an undersupply. The positive of this was that even after I stopped nursing him, I had SO much milk and was able to feed him for so much longer and share with whomever needed some. With Luna, I didn't start pumping until she was about a month old and I only pumped once a day early in the morning when I was most full, in order to start a back-to-work stash. I was careful not to create an oversupply and really stick to supply and demand!

Tip #2: decide when you will start pumping and don't go overboard with too much, too fast. Let your body regulate your baby's needs, especially in the beginning. Once your milk supply is established, pump as you need. (Think: are you pumping so someone else can feed the baby and you can get a break? or are you saving for a rainy day or back to work?) You just want to be mindful that the more you pump, the more your body will produce- supply and demand!

With Oliver, I had a huge supply, I would pump and get enough for at least 2 bottles, maybe even 3! With Luna, I'm lucky if I get enough for 1 bottle, sometimes 1.5. Once in a great while, I get enough for 2 bottles. They each took 4 ounces starting at 3 months and that amount did not increase over time. Breastmilk changes to meet the baby's demands- from fattier to lighter for their needs. It's freaking amazing!! Oliver clusterfed ALL THE TIME, while Luna clusterfed for the first 6-8 weeks and then went to every 2-3 hours and is still the same; she currently takes 3-4 oz in a feeding. Oliver also comfort nursed 24/7; Luna gets mad if she's tired and I try to nurse her, haha! Again, each baby is so different. Oliver still has trouble going and staying asleep, never slept through the night; Luna slept 6 straight hours the night we brought her home and always has given us a long stretch through the night (with an off night every now and then). The one thing that has been true for both, and I think applies for the majority of babies, is supply and demand- the more you put your baby to the breast, the more your body will produce. Don't worry if your baby is feeding every hour on the hour (or if your baby feeds for only 10 min- ahem, Luna; or for 45 minutes- ahem, Oliver), your body is producing what they need- even if they are hungry right after! I find that we freak out and think they are starving and we are not making enough, but 9/10 times we are! But we get so worried that we think otherwise. Also, remember that your baby's stomach is marble sized when it is born and your milk is super filling so a little goes a long way! Lots of skin-to-skin, take a stay-at-home-nursing-vacay where all you do nurse that baby around the clock!

Tip #3: if you want your body to produce more milk, put your baby to your breast as often as possible- preferably skin-to-skin. & try hard not to overthink anything! If your baby wants on all the time, it's what your baby may need at the time. Always look at wet diapers and that your baby is gaining a bit at each weigh in.

Having great products also helps, but there's so much on the market, it's hard to decide what to buy AND what will your body respond to. The two things that are tried and true are toooons of water (I'm talking if you think you drink enough, you need more; I shoot for a gallon a day and sometimes I need more than that); you also need a well-balanced way of eating. There are so many foods that are said to boost your supply and a quick Google search will lead you there. Aside from those two things, you need a good pump (I swear by my Spectra S1- it's a closed-system, rechargeable, and so much more gentle than the Medela Pump-in-Style I used with Oliver, which mostly everyone uses but I really don't care for). It's important to make sure your flanges fit properly (when I was using flanges, I had to buy different ones to fit me) and you will need a hands-free pumping bra! I don't currently use flanges; instead I use Freemie cups which fit into my regular nursing bra or sports bra and I don't have to change in and out of my bra and top every pump! I love them except for them not being super clear so sometimes I have to readjust multiple times to make sure the right part is being pumped, haha! I've also learned to start my pump before I put them on so I can instantly see what part is being sucked in (otherwise, if it pump the wrong part, you'll end up with zero milk). I also don't trust it's measuring so after I pump, I put them in a bottle, then a  storage bag. I pump on the way to work, and twice during my work day. I pump for 15-20 minutes max each time. Medela makes awesome wipes for your pump parts and a sanitizer ziplock bag that is amazing because you can sanitize it in the microwave! Lanisoh storage bags are my favorite but I don't like pumping into them- I I also use separate washing brushes for all my breast pump and bottles! An extra set of pump parts is always nice if you are pumping while at work, too- not necessary for just the occasional pumping though! When storing my milk, I only store in 4 oz or less amounts. My favorite bottles are Comotomo! I used them for both O and Lulu! If I am consistently not pumping enough, I power pump- google it so you can learn all about it!! Also, a silicone manual pump works amazing at catching the other side, especially in the beginning when your supply is all over the place and your milk isn't regulated.

Tip #4: Be ready to pump with the right pump, flanges, and parts! 

A support system while breastfeeding and pumping is key to your relationship with this, too! Of course, having the support of your partner and/or family is great! But stay true to what you want to do. This includes your admin if you are working! Know your state laws and don't be afraid to use them. When I was nursing Oliver, I had my own office and could come and go as I pleased so I didn't inconvenience anyone. Now that I'm teaching, I felt SO bad inconveniencing anyone to cover my class in order to pump but everyone has been SO supportive and willing to help!
In the first few weeks post-birth, I went to multiple Lactation Consultants even though I was super familiar with nursing- I don't know all that there is to know and I wanted to make sure I wasn't missing anything (although I'm sure I still am)! So before you leave the hospital, meet with one and then make appointments with ones in your community! They are angels!
I had stocked up on foods that boost supply and a few supplements as well! I did get my placenta made into pills and I am unsure if they helped or not, but I would do it again! I also used Oat Mama bars and absolutely loved them! Tasty and with milk boosting ingredients, plus gave me the extra calories needed for breastfeeding! Also, Mother's Milk tea! I have also become super familiar with www.kellymom.com which is so beneficial for so many questions I have had. I also follow a Lactation Consultant on IG that gives great tips!

Tip #5: Create a great support system for yourself!
Build a good support system at home, work (if applicable), with a Lactation Consultant, & friends online! Become familiar with supplements and real foods to boost your supply, and know that you are not alone! Breastfeeding and pumping are a lot of work (at least for me) and pumping is super inconvenient for my lifestyle but I make it work because it's what I want to do for my baby. But again, do you, boo! I've spoken numerous times about why I pump/nurse and they are exclusive to me. Don't feel that this is the only way, some great formulas exist out there- heck, I'm a formula baby and came out really healthy! Haha! Seriously, decide what it is you want and go for it!

I hope these tips help! I can talk about breastfeeding for hours, but I think this is a good overview! Let me know if you have any questions!

xoxo,
J

12/08/2017

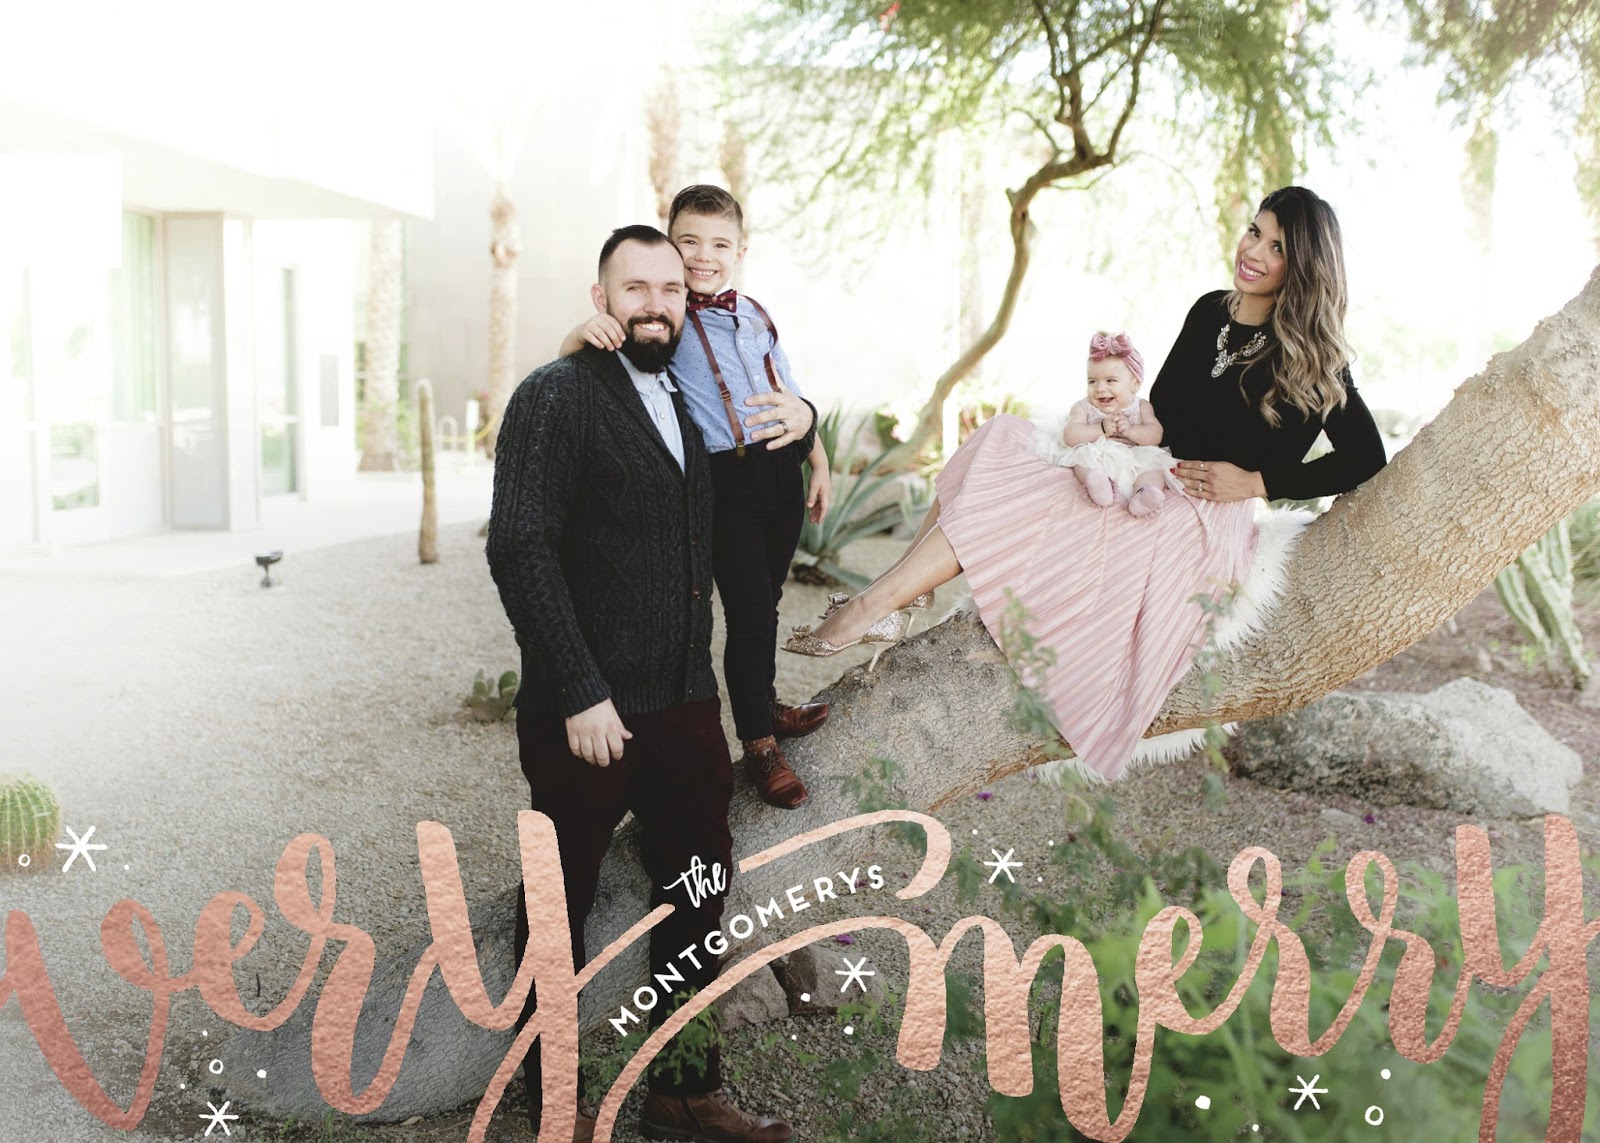
Our Holiday Cards with Minted


// This post is sponsored by Minted and contains affiliate links.  All opinions are entirely my own! //


Geoff and I have always been avid holiday card givers! We absolutely love coming up with a picture to commemorate the season or year and then usually DIY the print job on them! Throughout the years, when we receive cards from our loved ones, Minted ones stand out each time! The print quality is so nice and the paper is so luxe! This year, I feel so lucky to have been able to partner up with Minted for our holiday cards!
 We were originally going to do only pictures of Luna and Oliver but at the very last minute (I’m talking, 20 minutes before we were leaving to shoot them), we decided we should be in them. So we tripod and timer’d them! Let me tell you, we were a hot mess! Getting an infant and a toddler to look at a camera on a tripod without anyone there to guide them- ahhh! We also were super unprepared because we needed a location and both thought the other had one in mind already! So it took us about an hour of driving around, and another to actually get a decent shot! Not to mention that in between this, we missed Luna’s awake happy time and had to wait for her to eat and take a power nap before we could attempt it again. Our first location was awesome- an old part of downtown with an old white gate and steps, but it was so windy that our littles were not having it (since there was nothing to block the wind). Our second location was unexpected but had an awesome tree and cacti surrounding it so we laid our plush white rug over the low trunk, and up we crowded around it! Let me tell you that sitting on a tree trunk is not all it’s jazzed up to be haha! Once we got home, we uploaded the pictures and found the best one and let me say that considering the trouble it took, I’m super happy with the picture we chose! Luna’s tiny little body sitting on me, with her clasping her tiny hands, with her tiny bracelet, smiling so big at her daddy and brother….all the heart eyes! Oliver and Geoff look so happy and handsome, too! After a quick edit, we uploaded the picture onto Minted.com and got to choosing our design!

I knew I wanted gold foil so I was able to quickly navigate through the sort options and choose that since there are so many beautiful choices available. I was set on gold as always but then saw that the card we chose has a beautiful rose gold option and it matched what we were wearing better! I also had realized that we never got a chance to mail out a birth announcement for Luna, and Minted actually has an option to add to your card in the back (it actually even gives you the option for a little book, multiple pictures, an actual birth announcement, and many others). We chose Luna’s IVF picture with all the IVF needles we used forming a moon and wrote our holiday greeting on the back!
 
There are SO many options, you guys! From the envelope liner, to the fonts used, to the style you want- the possibilities are truly endless for your perfect customization! I love that they have so many designs by independent artists- so it feels like you are supporting creative people: Minted has competitions where artist enter their submissions, we vote, and voila, a winner is chosen and becomes a card you get to customize! How rad is that?
I also was super extra (duh) and created customized stamps! I couldn’t help it! We had some really awesome captures of Luna and Oliver from the first location we shot at that we just needed to use! I even got to write my favorite quote for them on it “Love by the sun, live by the moon!” 
Minted.com also has an Excel spreadsheet you can add your addresses to and I’m so glad I used it because now I have an organized way to keep addresses that I can add onto or edit throughout the year! Did I mention they have free personalization?! How amazing is that!!
This one is going out for our IVF doctor! & yes I realized after this picture, the stamp was on the wrong side- oops! haha!

Once we ordered, we had the option of getting a proof emailed to us or just finalizing it. I went with getting a proof first and I’m SO glad I did because despite how many times I looked at it, I completely missed that I hadn’t changed the default family name in the front of the card. So we almost got cards that said “Love, the Andersons” hahaha! Within a few days, we received our cards and omg!! The quality is superb, the customer service is on point, the designs are beautiful and you can’t beat free addressee personalization!

They also have gifts you can personalize using your pictures which make great year round gifts for your loved ones!

Have you ordered your holiday cards this year? You don’t have to go out and shoot new pictures! You can choose favorites from this past year! & Minted even has New Years cards and all sorts of greeting cards and announcements! I am hooked and know so many friends that are, too!

Snail mail is my absolute favorite (seriously, I check it every day excitedly) and love receiving and sending mail! I hope you do, too!! Happy Holidays from Minted & us!

 Minted is having a sale right now so you still have time! Holiday and New Year cards are 15% off or you can enjoy free shipping!

click here for a discount or free fast shipping!!


Blogger Tips and TricksLatest Tips And TricksBlogger Tricks